運用するにあたって、監視が重要なのは言うまでもないので監視ツールであるPrometheusを使ってみる。
今回はkubernetesのノードをprometheusで監視する。
目次
環境
- OS: Ubuntu18.04
- Prometheus: 2.3.2
- Kubernetes: 1.11.1
Prometheusとは?
オープンソースな監視ツール。
k8sとの連携、サービスディスカバリー機能を備えているので、podの監視やk8sノードの監視などが可能。
Prometheus自体はPull型(Prometheusから情報を取りに行く)で情報を取得してくるのみなので、これらを視覚的に表示したい場合には別ツールが必要。
アーキテクチャは公式よりお借りした画像がわかりやすい。
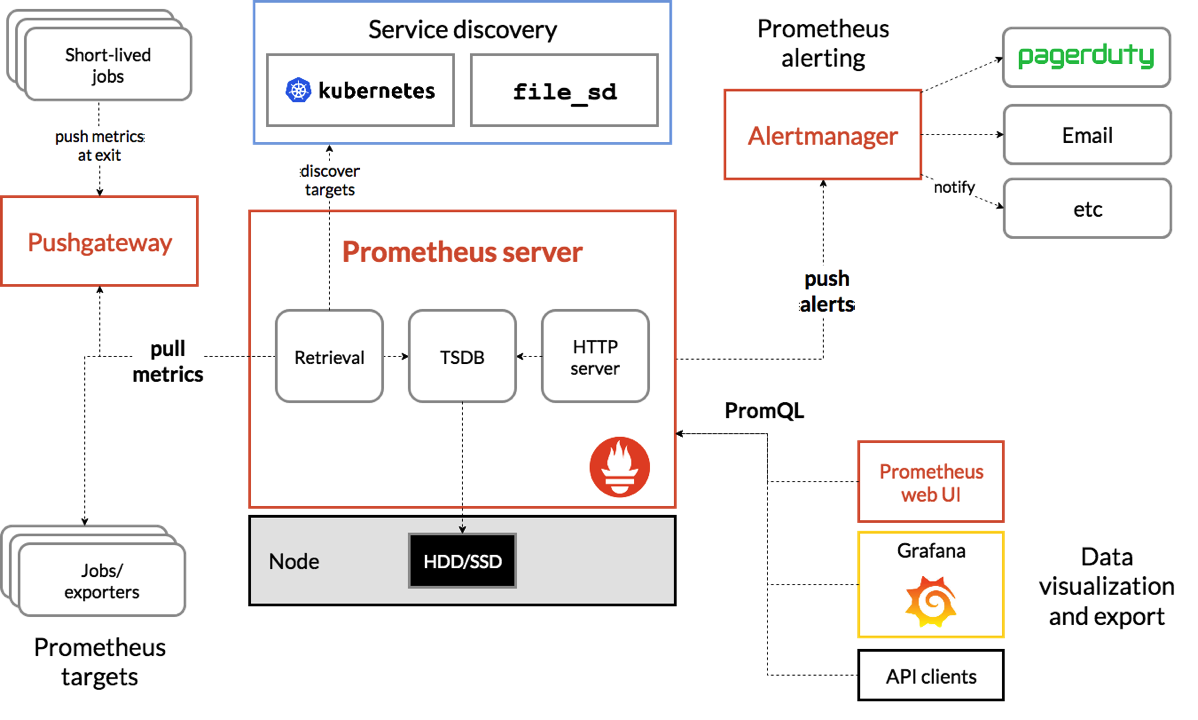
PromQLを使って、情報を取得できるのでGrafanaなどを使ってグラフ化可能。
Prometheusのインストール
今回はPrometheusを別ホストで用意する。
Ubuntu18.04をインストールし、バイナリを公式から取得する。
$ wget https://github.com/prometheus/prometheus/releases/download/v2.3.2/prometheus-2.3.2.linux-amd64.tar.gz
$ tar xzf prometheus-2.3.2.linux-amd64.tar.gz
$ cd prometheus-2.3.2.linux-amd64/
バイナリなので、あとは起動するコマンドを叩くだけでprometheus自体は動作する。
GetStartedにある設定でまずは動作させてみる。
# prometheus.yml
global:
  scrape_interval:     15s # By default, scrape targets every 15 seconds.

  # Attach these labels to any time series or alerts when communicating with
  # external systems (federation, remote storage, Alertmanager).
  external_labels:
    monitor: 'codelab-monitor'

# A scrape configuration containing exactly one endpoint to scrape:
# Here it's Prometheus itself.
scrape_configs:
  # The job name is added as a label `job=<job_name>` to any timeseries scraped from this config.
  - job_name: 'prometheus'

    # Override the global default and scrape targets from this job every 5 seconds.
    scrape_interval: 5s

    static_configs:
      - targets: ['localhost:9090']
起動
$ ./prometheus --config.file=prometheus.yml
デフォルトは9090番ポートでサービスを起動するので、ブラウザからアクセスると起動していることが確認できる
ちなみに、ログにどのポートかもでている。
level=info ts=2018-08-11T00:51:22.955969113Z caller=web.go:415 component=web msg="Start listening for connections" address=0.0.0.0:9090
ポート変えたければこんな感じ
$ ./prometheus --config.file=prometheus.yml --web.listen-address="0.0.0.0:19090"
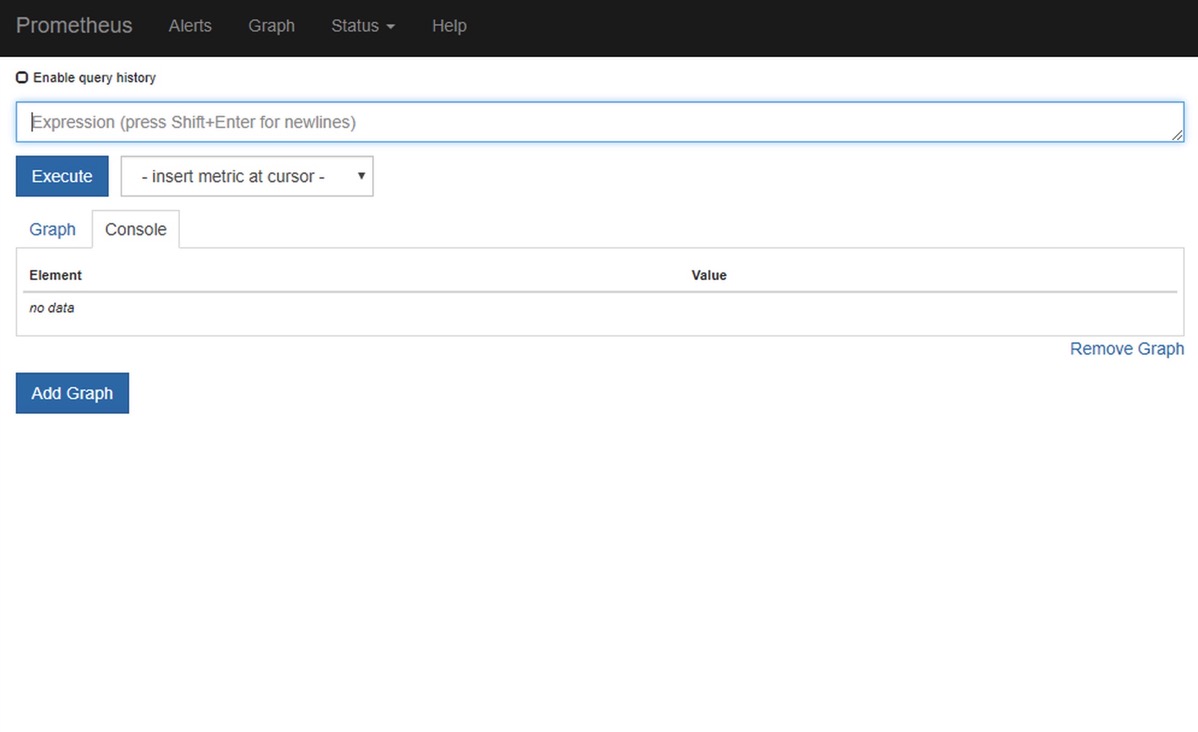
では、実際にアクセス。
このトップ画面で、取得できたデータを数値やグラフで確認できる。
Status -> Targets で現在のターゲットとラベルを確認。
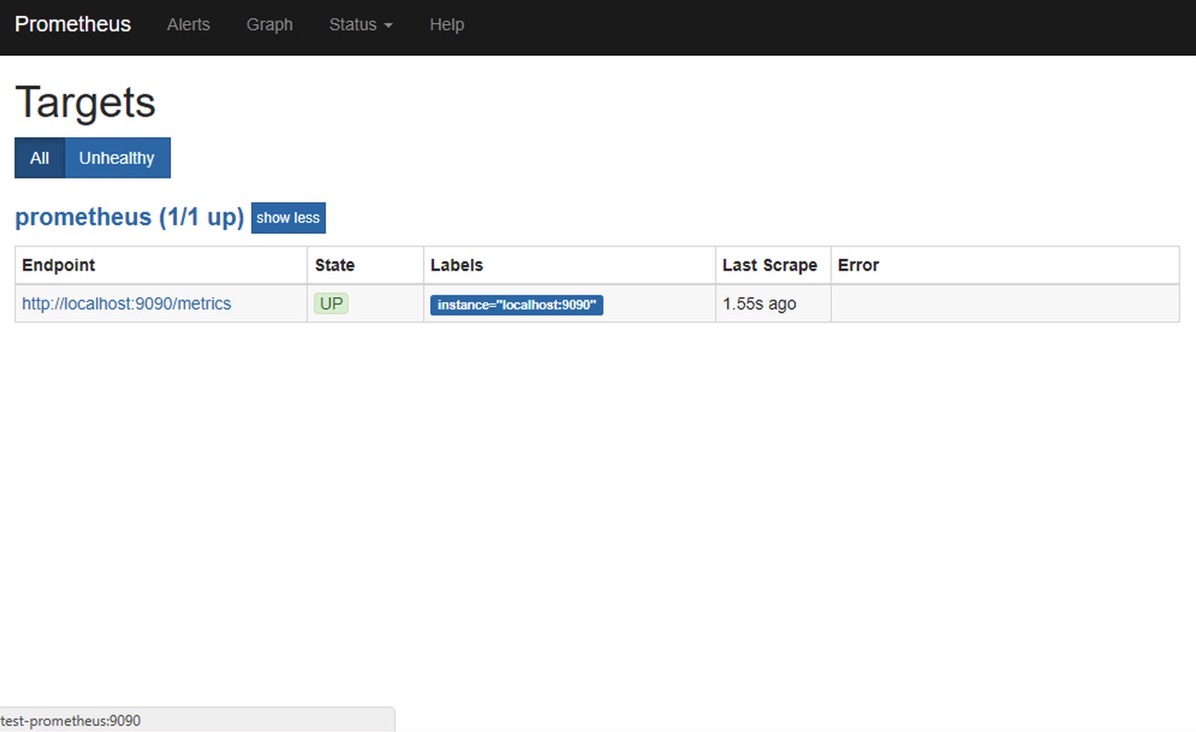
ターゲットをクリックすると、現在取得しているmetricsなども確認できる。
以下のようなものが見える。
# HELP go_gc_duration_seconds A summary of the GC invocation durations.
# TYPE go_gc_duration_seconds summary
go_gc_duration_seconds{quantile="0"} 1.9924e-05
go_gc_duration_seconds{quantile="0.25"} 3.0488e-05
go_gc_duration_seconds{quantile="0.5"} 3.8445e-05
go_gc_duration_seconds{quantile="0.75"} 4.3432e-05
go_gc_duration_seconds{quantile="1"} 7.2718e-05
go_gc_duration_seconds_sum 0.000589506
go_gc_duration_seconds_count 15
# HELP go_goroutines Number of goroutines that currently exist.
<snip>
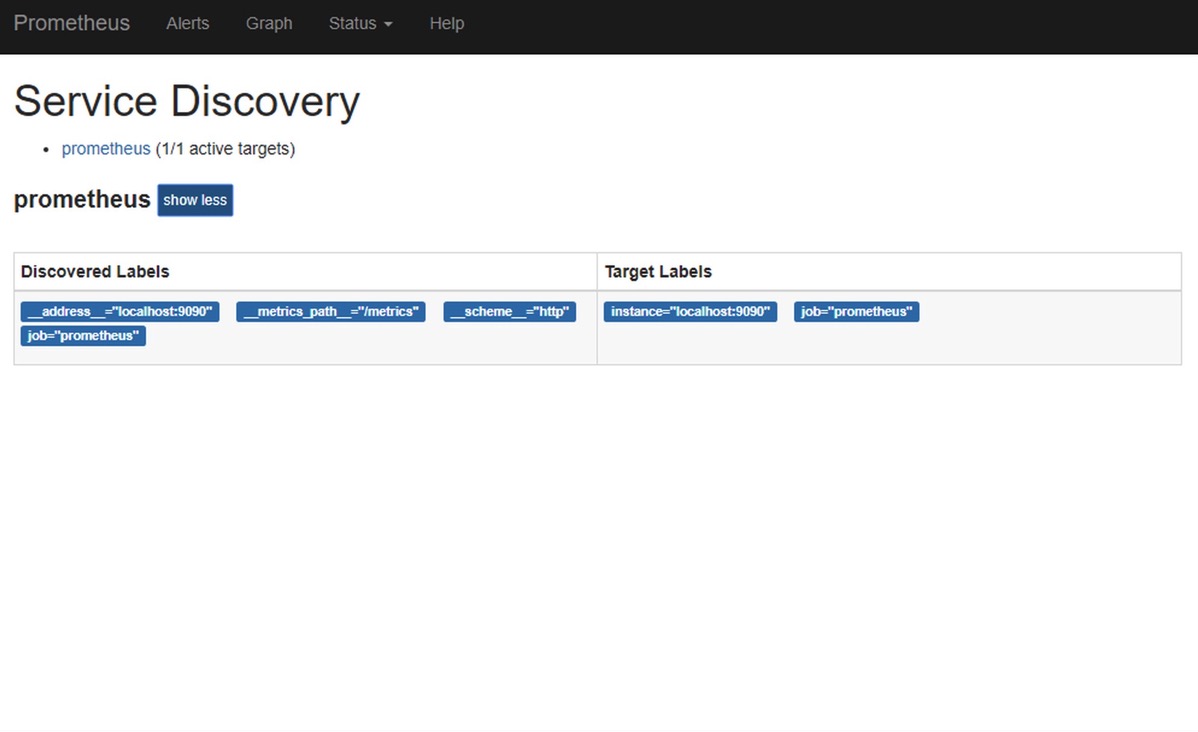
Status -> Service Discovery で現在のサービスディスカバリーの状態を確認。
Kubernetesなのでrelabel_configsなどを使って絞る場合には、役に立つページ。
Kubernetes ノードの監視
Node exporterを使って、Kubernetesのノードを監視してみる。
まずは、Daemon Setを使ってNode exporterのpodを作ることが必要。
適当にDaemon Setの設定を作る。
# node-exporter-daemonset.yml
apiVersion: extensions/v1beta1
kind: DaemonSet
metadata:
  name: node-exporter
  namespace: monitoring
spec:
  template:
    metadata:
      labels:
        app: node-exporter
      annotations:
        prometheus.io/scrape: 'true'
        prometheus.io/port: '9100'
        prometheus.io/path: '/metrics'
    spec:
      containers:
      - name: node-exporter
        image: quay.io/prometheus/node-exporter
        ports:
        - containerPort: 9100
      hostNetwork: true
      hostPID: true
監視用ネームスペースとサービスアカウントを作ってDaemonsetを起動する。
今回はRBACがめんどくさいので、cluster-adminロールを割り当ててるが実際は必要な権限だけ与えるべき。
$ kubectl create ns monitoring
$ kubectl -n monitoring create serviceaccount prometheus
$ kubectl -n monitoring create clusterrolebinding prometheus-clusterrolebinding --clusterrole=cluster-admin --serviceaccount=monitoring:prometheus
Daemon Setを起動
$ kubectl -n monitoring create -f node-exporter-daemonset.yml
起動を確認。
$ kubectl get pod -o wide
NAME                  READY     STATUS    RESTARTS   AGE       IP             NODE
node-exporter-l24cf   1/1       Running   0          56s       10.16.181.92   test-node1
node-exporter-tqksd   1/1       Running   0          56s       10.16.181.93   test-node2
加えて、metricsが取れるかも確認。
$ curl http://10.16.181.92:9100/metrics 2> /dev/null | head
# HELP go_gc_duration_seconds A summary of the GC invocation durations.
# TYPE go_gc_duration_seconds summary
go_gc_duration_seconds{quantile="0"} 3.002e-05
go_gc_duration_seconds{quantile="0.25"} 4.8186e-05
go_gc_duration_seconds{quantile="0.5"} 5.9836e-05
go_gc_duration_seconds{quantile="0.75"} 0.000101839
go_gc_duration_seconds{quantile="1"} 0.000121159
go_gc_duration_seconds_sum 0.000827274
go_gc_duration_seconds_count 12
# HELP go_goroutines Number of goroutines that currently exist.
PrometheusにNode exporterの設定を追加
Node exporterが起動したので、prometheusに設定を入れていく。
前回使った設定にjobを追加すればよい。
  - job_name: 'k8s-node-exporter'
    # Config for kubernetes
    kubernetes_sd_configs:
    - role: pod
      api_server: "https://10.16.181.91:6443"
      namespaces:
        names:
        - monitoring
      tls_config:
        insecure_skip_verify: true

      bearer_token: eyJhbGciOiJSUzI1NiIsImtpZCI6IiJ9.eyJpc3MiOiJrdWJlcm5ldGVzL3NlcnZpY2VhY2NvdW50Iiwia3ViZXJuZXRlcy5pby9zZXJ2aWNlYWNjb3VudC9uYW1lc3BhY2UiOiJtb25pdG9yaW5nIiwia3ViZXJuZXRlcy5pby9zZXJ2aWNlYWNjb3VudC9zZWNyZXQubmFtZSI6InByb21ldGhldXMtdG9rZW4tdGw4c2ciLCJrdWJlcm5ldGVzLmlvL3NlcnZpY2VhY2NvdW50L3NlcnZpY2UtYWNjb3VudC5uYW1lIjoicHJvbWV0aGV1cyIsImt1YmVybmV0ZXMuaW8vc2VydmljZWFjY291bnQvc2VydmljZS1hY2NvdW50LnVpZCI6IjhkNGMxYjVkLTk5MjEtMTFlOC1hNjRjLTAwNTA1NmE4MzFmZiIsInN1YiI6InN5c3RlbTpzZXJ2aWNlYWNjb3VudDptb25pdG9yaW5nOnByb21ldGhldXMifQ.bCdR7UzUSxAeDi9rs5uPjCJLc2bmpihjYOHKZTd9ZauSLG9eassQfS68_ADyzV3lYlk2n9zeDhEt1Cz1Xg9jOIn8ItLeCYQN6f-fsmm1J9Z-1SEYEhqT3HKkMiuJF9iP3nlfrgsv-u0gUQ_YokMA_K4WPHmKxkptHQUE6Lic7-vDgYgmibFHut8TQYqIBVVY4Wz4d5iigmdRXS-xNBLrzooeE_Cc8UcOSmOy34pqN8oZo-qrgkDPk3ds9Dq--MsA2ZVj2bnhT5-7oyo9AZA43mWdDrP3PousZF7DxfBz4X1xu5Yp3nXZf1kejZ0IeFli9JO-VUtQehOlnHrT0IkkPg

    relabel_configs:
    - source_labels: [__meta_kubernetes_pod_annotation_prometheus_io_scrape]
      action: keep
      regex: true
    - source_labels: [__meta_kubernetes_pod_annotation_prometheus_io_path]
      action: replace
      target_label: __metrics_path__
      regex: (.+)
    - source_labels: [__address__, __meta_kubernetes_pod_annotation_prometheus_io_port]
      action: replace
      regex: (.+):(?:\d+);(\d+)
      replacement: ${1}:${2}
      target_label: __address__
    - action: labelmap
      regex: __meta_kubernetes_pod_label_(.+)
kubernetesから情報を取得するために、APIサーバのアドレスとtokenを設定する必要がある。
各設定については以下の通り。
roleはpod
ノードの情報を取得したいが、サービスディカバリーの対象はNode exporterなのでpodにapi_server
~/.kube/configなどにあるAPIサーバのアドレスとポート。
ちなみに、prometheusがkubernetes内で動いて入れば設定の必要がない。namespaces
monitoringのみtls_config
今回はバリデーションをスキップさせた。bearer_token
prometheus用のサービスアカウントのトークンを設定。
kubectl -n monitoring get secret prometheus-token-tl8sg -o 'jsonpath={$.data.token}' | base64 -dな感じで取得可能。relabel_configs
サービスディスカバリーに必要な設定となる。
今回はつまり、どのpodがnode exporterなのか。そして、どのアドレス、ポート、パスを使って情報を取得するのか。各情報にどのようなメターデータを付加するのかというのを設定している。- どのpodがnode exporterなのか
annotationを使っている。最初のaction: keepの設定でprometheus.io/scrape: 'true'node exporterを絞っている。 - どのアドレス、ポート、パスを使って情報を取得するのか
annotationを使っている。prometheus.io/port: '9100'とprometheus.io/path: '/metrics'を取得して、action: replaceでポートとパスの情報を与えている。 - どのようなメターデータを付加するのか
この例では、podに付加されているlabelをメタデータとして使えるようにしている。
- どのpodがnode exporterなのか
では、prometheus.ymlに追加して、再起動する。
$ ./prometheus --config.file=prometheus.yml
Status -> Targets にいって、Node exporterに対してのパスが見えていれば成功。
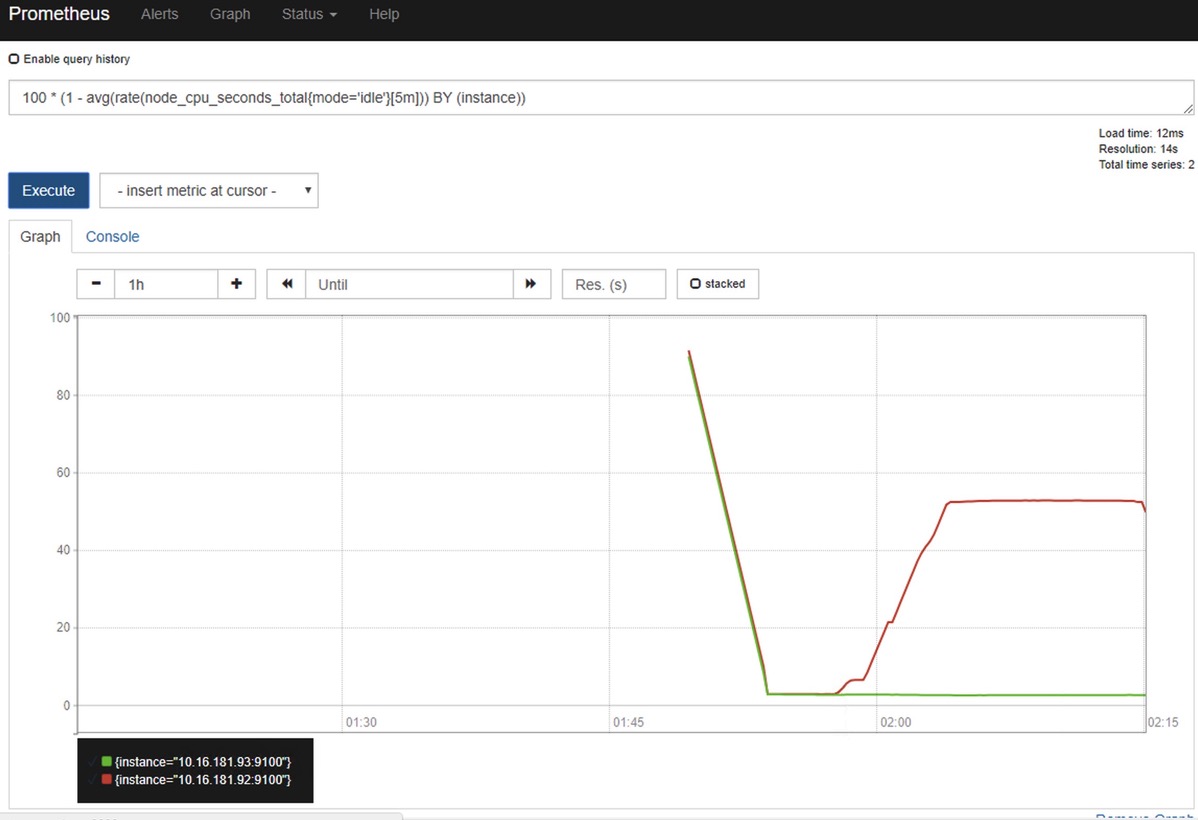
試しに、ノードのCPUの使用率を見てみる。
CPUごとの使用率を見るには、以下のクエリ。
100 * (1 - rate(node_cpu_seconds_total{mode='idle'}[5m]))
ノード全体のCPU使用率は以下のクエリ。
100 * (1 - avg(rate(node_cpu_seconds_total{mode='idle'}[5m])) BY (instance))
ノード上で負荷を上げてみるとグラフも上がるので、正しく取得できてることが確認できる。
次回は別の情報を取得できるように設定する。
参考
- 公式サイト
https://prometheus.io/