K8sクラスタを作ることが増えた反面、作成の手間がしんどいのでClusterAPIに入門しました。まずは、ESXi上にManagementクラスタをつくるところまで進めます。
ClusterAPIのGithubページはここです。基本的にここにあるQuick StartとvSphere向けClusterAPIのQuick Startに沿って進めていきます。
目次
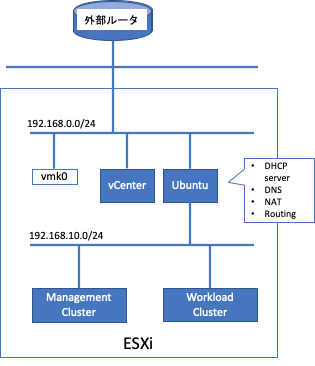
構成
- 物理 ESXi6.7 1台
だけです。この上に Ubntu20.04とvCenterを立ててk8sクラスタの作成や操作に使用する予定です。ESXiとvCenterのデプロイ部分は割愛します。
ClusterAPIインストールのための準備
Ubuntu20.04のインストール
今回はUbuntu20.04をインストールしていきます。インストールはスムーズなので内容はスキップします。インストール後は基本的なパッケージのアップグレードを行う。
sudo apt update
sudo apt upgrade
Managementクラスタを作るためには、いくつか必須パッケージがあるのでインストールしていきましょう。
Dockerのインストール
Dockerのインストールですが、ここに沿って実行します。
sudo apt-get install apt-transport-https ca-certificates curl gnupg-agent software-properties-common
curl -fsSL https://download.docker.com/linux/ubuntu/gpg | sudo apt-key add -
sudo add-apt-repository "deb [arch=amd64] https://download.docker.com/linux/ubuntu $(lsb_release -cs) stable"
sudo apt-get update
sudo apt-get install docker-ce docker-ce-cli containerd.io
インストール後にrootでなくてもdockerコマンドが実行できるように現ユーザをdockerグループに追加します。
sudo groupadd docker
sudo usermod -aG docker $USER
localadminで実行できるか確認のため、ログアウトしてログインし直します。次のコマンドで実際にdockerが正常稼働しているかテストします。
localadmin@ubuntu-jump:~$ docker run hello-world

Hello from Docker!
This message shows that your installation appears to be working correctly.

To generate this message, Docker took the following steps:
 1. The Docker client contacted the Docker daemon.
 2. The Docker daemon pulled the "hello-world" image from the Docker Hub.
    (amd64)
 3. The Docker daemon created a new container from that image which runs the
    executable that produces the output you are currently reading.
 4. The Docker daemon streamed that output to the Docker client, which sent it
    to your terminal.

To try something more ambitious, you can run an Ubuntu container with:
 $ docker run -it ubuntu bash

Share images, automate workflows, and more with a free Docker ID:
 https://hub.docker.com/

For more examples and ideas, visit:
 https://docs.docker.com/get-started/
kubectlのインストール
kubectlコマンドをインストールします。今回は最新の安定バージョンである1.19.4を使用します。
curl -LO https://storage.googleapis.c
om/kubernetes-release/release/v1.19.4/bin/linux/amd64/kubectl
chmod +x ./kubectl
sudo mv ./kubectl /usr/local/bin/kubectl
インストール後はコマンドがPATHの通った場所にあるか念の為確認します。
localadmin@ubuntu-jump:~$ kubectl version --client
Client Version: version.Info{Major:"1", Minor:"19", GitVersion:"v1.19.4", GitCommit:"d360454c9bcd1634cf4cc52d1867af5491dc9c5f", GitTreeState:"clean", BuildDate:"2020-11-11T13:17:17Z", GoVersion:"go1.15.2", Compiler:"gc", Platform:"linux/amd64"}
kindのインストール
ClusterAPI上で0.8.Xを使ったものが最新になっているので、0.8.Xの最新をインストールします。
curl -Lo ./kind https://kind.sigs.k8s.io/dl/v0.8.1/kind-linux-amd64
chmod +x ./kind
sudo mv ./kind /usr/local/bin/kind
govcのインストール
現時点で最新のリリースをダウンロードしてインストールします。
curl -L https://github.com/vmware/govmomi/releases/download/v0.23.0/govc_linux_amd64.gz | gunzip  > ./govc
chmod +x ./govc
sudo mv ./govc /usr/local/bin/govcgovcに必要なvCenter向けの情報を以下の通り環境変数として設定します。~/.bashrcなどに追加すれば、毎回入力する必要はありませんが、パスワードなどを含むので自己責任で設定して下さい。
export GOVC_INSECURE=1
export GOVC_URL=<vCenter IP>
export GOVC_USERNAME=administrator@home.lab
export GOVC_PASSWORD=<vCenter root password>
export GOVC_DATASTORE=<vCenter Datastore>
Ubuntu20.04をルータとして設定
先程インストールしたUbuntuをルータとしても使用する場合には、以下のポストを参照して下さい。
 Ubuntu20.04でルータを作成
Managementクラスタの作成準備
必要パッケージがインストールできたので、Managementクラスタを作成するための準備を行います。vSphere向けの始め方はここにあるとおりなので、手順通りに進めていきます。
VMのテンプレートのアップロード
今回はもともと用意されているイメージをテンプレートとして使いたいと思います。Managementクラスタ用には実際必要ないのですが、ClusterAPIの準備として実施してください。まずイメージをダウンロードします。
wget http://storage.googleapis.com/capv-images/release/v1.18.2/ubuntu-1804-kube-v1.18.2.ova続いて、本イメージをvSphereにアップロードしてテンプレートとして設定します。
govc import.ova ./ubuntu-1804-kube-v1.18.2.ova
govc snapshot.create -vm ubuntu-1804-kube-v1.18.2 root
govc vm.markastemplate ubuntu-1804-kube-v1.18.2
clusterctlのインストール
clusterctlをインストールします。
curl -L https://github.com/kubernetes-sigs/cluster-api/releases/download/v0.3.11/clusterctl-linux-amd64 -o clusterctlchmod +x ./clusterctlsudo mv ./clusterctl /usr/local/bin/clusterctlPATHが通っている場所にインストールしたら、動くことを確認します。
localadmin@ubuntu-jump:~$ clusterctl versionclusterctl version: &version.Info{Major:"0", Minor:"3", GitVersion:"v0.3.11", GitCommit:"e9cf6846b6d93dedadfcf44c00357d15f5ccba64", GitTreeState:"clean", BuildDate:"2020-11-19T18:49:17Z", GoVersion:"go1.13.15", Compiler:"gc", Platform:"linux/amd64"}Managementクラスターの作成
Kindクラスターの作成
kindでManagement用クラスターをたてます。
localadmin@ubuntu-jump:~$ kind create cluster
Creating cluster "kind" ...
 ✓ Ensuring node image (kindest/node:v1.18.2) 🖼
 ✓ Preparing nodes 📦
 ✓ Writing configuration 📜
 ✓ Starting control-plane 🕹️
 ✓ Installing CNI 🔌
 ✓ Installing StorageClass 💾
Set kubectl context to "kind-kind"
You can now use your cluster with:

kubectl cluster-info --context kind-kind

Have a question, bug, or feature request? Let us know! https://kind.sigs.k8s.io/#community 🙂
クラスタが出来た後は、以下のコマンドで確認を行います。
localadmin@ubuntu-jump:~$ kubectl cluster-info --context kind-kind
Kubernetes master is running at https://127.0.0.1:46629
KubeDNS is running at https://127.0.0.1:46629/api/v1/namespaces/kube-system/services/kube-dns:dns/proxy

To further debug and diagnose cluster problems, use 'kubectl cluster-info dump'.
Kindで作ったクラスタをManagementClusterとして構成
ManagementCluster内にvSphereと話す用のClusterAPI Providerをデプロイします。今回指定した設定は以下の通りで、リソースプールとフォルダはデフォルトのままで変更しませんでした。
VSPHERE_USERNAME=administrator@home.lab
VSPHERE_PASSWORD=<vCenter Password>
VSPHERE_SERVER=<vCenter IP>
VSPHERE_DATACENTER=<k8s用Datacenter>
VSPHERE_DATASTORE=<k8sノードが使うデータストア>
VSPHERE_NETWORK=<k8sノードが接続するネットワーク>
VSPHERE_RESOURCE_POOL=*/Resources
VSPHERE_FOLDER=vm
VSPHERE_TEMPLATE=ubuntu-1804-kube-v1.18.2
CONTROL_PLANE_ENDPOINT_IP=192.168.10.11
VSPHERE_SSH_AUTHORIZED_KEY=$(cat ~/.ssh/id_rsa.pub)ここのCONTROL_PLANE_ENDPOINTは、デプロイされたワークロードクラスタのコントロールプレーンのフローティングIPになるので、k8sノードが接続されるネットワークの中から空いてるIPを今回は割り当てています。
続いて、上記の値を元にclusterctl.yamlを作成します。
cat << EOF > ~/.cluster-api/clusterctl.yaml
## -- Controller settings -- ##
VSPHERE_USERNAME: "${VSPHERE_USERNAME}"
VSPHERE_PASSWORD: "${VSPHERE_PASSWORD}"

## -- Required workload cluster default settings -- ##
VSPHERE_SERVER: "${VSPHERE_SERVER}"
VSPHERE_DATACENTER: "${VSPHERE_DATACENTER}"
VSPHERE_DATASTORE: "${VSPHERE_DATASTORE}"
VSPHERE_NETWORK: "${VSPHERE_NETWORK}"
VSPHERE_RESOURCE_POOL: "${VSPHERE_RESOURCE_POOL}"
VSPHERE_FOLDER: "${VSPHERE_FOLDER}"
VSPHERE_TEMPLATE: "${VSPHERE_TEMPLATE}"
CONTROL_PLANE_ENDPOINT_IP: "${CONTROL_PLANE_ENDPOINT_IP}"
EXP_CLUSTER_RESOURCE_SET: "true"
VSPHERE_SSH_AUTHORIZED_KEY: "${VSPHERE_SSH_AUTHORIZED_KEY}"
EOF
その後、ClusterAPIをkindのクラスタにデプロイします。
clusterctl init --infrastructure vsphereコマンドを実行すると下記のようなログを出しつつデプロイします。
localadmin@ubuntu-jump:~$ clusterctl init --infrastructure vsphere
Fetching providers
Installing cert-manager Version="v0.16.1"
Waiting for cert-manager to be available...
Installing Provider="cluster-api" Version="v0.3.11" TargetNamespace="capi-system"
Installing Provider="bootstrap-kubeadm" Version="v0.3.11" TargetNamespace="capi-kubeadm-bootstrap-system"
Installing Provider="control-plane-kubeadm" Version="v0.3.11" TargetNamespace="capi-kubeadm-control-plane-system"
Installing Provider="infrastructure-vsphere" Version="v0.7.1" TargetNamespace="capv-system"

Your management cluster has been initialized successfully!

You can now create your first workload cluster by running the following:

  clusterctl config cluster [name] --kubernetes-version [version] | kubectl apply -f -
デプロイし終わると、kindのクラスタには下記のようなPodが動いています。
localadmin@ubuntu-jump:~$ kubectl get pod -A
NAMESPACE                           NAME                                                             READY   STATUS    RESTARTS   AGE
capi-kubeadm-bootstrap-system       capi-kubeadm-bootstrap-controller-manager-8498485fd-9b6z7        2/2     Running   0          2m19s
capi-kubeadm-control-plane-system   capi-kubeadm-control-plane-controller-manager-78d6b98dd9-vsjvp   2/2     Running   0          2m6s
capi-system                         capi-controller-manager-799d6cd49b-cx9mv                         2/2     Running   0          2m34s
capi-webhook-system                 capi-controller-manager-5997784585-gjw9w                         2/2     Running   0          2m38s
capi-webhook-system                 capi-kubeadm-bootstrap-controller-manager-5f5f97d595-fhr2d       2/2     Running   0          2m28s
capi-webhook-system                 capi-kubeadm-control-plane-controller-manager-7fd5955bf4-r54xq   2/2     Running   0          2m16s
capi-webhook-system                 capv-controller-manager-64b45c8fdd-s2sr9                         2/2     Running   0          119s
capv-system                         capv-controller-manager-846f5b744f-2tzd8                         2/2     Running   0          107s
cert-manager                        cert-manager-578cd6d964-xrk66                                    1/1     Running   0          3m41s
cert-manager                        cert-manager-cainjector-5ffff9dd7c-t6qxz                         1/1     Running   0          3m41s
cert-manager                        cert-manager-webhook-556b9d7dfd-xhdq5                            1/1     Running   0          3m41s
kube-system                         coredns-66bff467f8-9l75q                                         1/1     Running   0          3m58s
kube-system                         coredns-66bff467f8-nbr6x                                         1/1     Running   0          3m58s
kube-system                         etcd-kind-control-plane                                          1/1     Running   0          4m6s
kube-system                         kindnet-b5s8r                                                    1/1     Running   0          3m58s
kube-system                         kube-apiserver-kind-control-plane                                1/1     Running   0          4m6s
kube-system                         kube-controller-manager-kind-control-plane                       1/1     Running   0          4m6s
kube-system                         kube-proxy-46pkp                                                 1/1     Running   0          3m58s
kube-system                         kube-scheduler-kind-control-plane                                1/1     Running   0          4m6s
local-path-storage                  local-path-provisioner-bd4bb6b75-mm8wk                           1/1     Running   0          3m58s
次回以降にこれらのPodについて見ていきたいと思います。