以前作成したHA構成にvSphere Storageを追加してサンプルアプリを動かしてみた。
ここを参考に構築
目次
概要
k8sから永続的なストレージをvSphereが提供するもの。
これにより、Podに障害があってダウンしても、再度作成された際にデータを引き継ぐことができる。
vSphereの動きは、データストア内にvmdkファイルを作成してPodが動くノードにハードディスクとして接続される。
インストール
手動で設定する方法がここにあるが、今回は自動スクリプトを用いる。
自動スクリプトはここに使い方がのってる。
設定方法は簡単で、まず必要なyamlをダウンロードする。
wget https://raw.githubusercontent.com/vmware/kubernetes/enable-vcp-uxi/enable-vsphere-cloud-provider.yaml
wget https://raw.githubusercontent.com/vmware/kubernetes/enable-vcp-uxi/vcp_namespace_account_and_roles.yaml
wget https://raw.githubusercontent.com/vmware/kubernetes/enable-vcp-uxi/vcp_secret.yaml
その後、vcp_secret.yamlを設定する。
まず、vCenterの管理用とユーザ用のアカウントをbase64でエンコードして設定。
ユーザの必要なロールについてはここを参照。
$ echo -n 'Administrator@vsphere.local' | base64
QWRtaW5pc3RyYXRvckB2c3BoZXJlLmxvY2Fs
$
$ echo -n 'password' | base64\
Vk13YXJlMSE=
続いてvCenterのIP,ポート、DC、データストア、VMフォルダなどを設定する。
最終的に変更した項目は以下の通り。
$ diff vcp_secret.yaml vcp_secret.yaml.org
14,17c14,17
<   vc_admin_username: QWRtaW5pc3RyYXRvckB2c3BoZXJlLmxvY2Fs
<   vc_admin_password: QWRtaW4hMjM=
<   vcp_username: dmNwdXNlckB2c3BoZXJlLmxvY2Fs
<   vcp_password: QWRtaW4hMjM=
---
>   vc_admin_username: QWRtaW5pc3RyYXRvckB2c3BoZXJlLmxvY2Fs
>   vc_admin_password: Vk13YXJlMSE=
>   vcp_username: QWRtaW5pc3RyYXRvckB2c3BoZXJlLmxvY2Fs
>   vcp_password: Vk13YXJlMSE=
19c19
<   vc_ip: "vCenter-IP-Address"
---
>   vc_ip: "192.168.1.1"
22c22
<   datacenter: "datacenter-name"
---
>   datacenter: "MYDC"
24c24
<   default_datastore: "datastore-name"
---
>   default_datastore: "datastore-32"
26c26
<   node_vms_folder: "kubernetes"
---
>   node_vms_folder: "k8snodes"
28c28
<   node_vms_cluster_or_host : "cluster-or-hostname"
---
>   node_vms_cluster_or_host : "Mgmt"
他の変数についてはガイドを参照して、変更したい場合には変更。
$ kubectl create -f vcp_namespace_account_and_roles.yaml
namespace "vmware" created
serviceaccount "vcpsa" created
clusterrolebinding "sa-vmware-default-binding" created
clusterrolebinding "sa-vmware-vcpsa-binding" created

$ kubectl create --save-config -f vcp_secret.yaml
secret "vsphere-cloud-provider-secret" created

$ kubectl create -f enable-vsphere-cloud-provider.yaml
pod "vcp-manager" created
vcp-managerを作成後に、watchで状態を確認
watch -n 10 kubectl get VcpSummary --namespace=vmware -o json
{
    "apiVersion": "v1",
    "items": [
        {
            "apiVersion": "vmware.com/v1",
            "kind": "VcpSummary",
            "metadata": {
                "annotations": {
                    "kubectl.kubernetes.io/last-applied-configuration": "{\"apiVersion\":\"vmware.com/v1\",\"kind\":\"VcpSummary\",\"metadata\":{\"annotations\":{},\"name\":\"vcpinstallstatus\",\"namespace\":\"\"},\"spec\":{\"nodes_being_configured\":\"0\",\"nodes_failed_to_configure\":\"0\",\"nodes_in_phase1\":\"0\",\"nodes_in_phase2\":\"0\",\"nodes_in_phase3\":\"0\",\"nodes_in_phase4\":\"0\",\"nodes_in_phase5\":\"0\",\"nodes_in_phase6\":\"0\",\"nodes_in_phase7\":\"0\",\"nodes_sucessfully_configured\":\"5\",\"total_number_of_nodes\":\"5\"}}\n"
                },
                "clusterName": "",
                "creationTimestamp": "2018-05-25T15:40:03Z",
                "generation": 1,
                "name": "vcpinstallstatus",
                "namespace": "",
                "resourceVersion": "1436964",
                "selfLink": "/apis/vmware.com/v1/vcpsummaries/vcpinstallstatus",
                "uid": "e4554158-6031-11e8-957b-005056a8a2b0"
            },
            "spec": {
                "nodes_being_configured": "0",
                "nodes_failed_to_configure": "0",
                "nodes_in_phase1": "0",
                "nodes_in_phase2": "0",
                "nodes_in_phase3": "0",
                "nodes_in_phase4": "0",
                "nodes_in_phase5": "0",
                "nodes_in_phase6": "0",
                "nodes_in_phase7": "0",
                "nodes_sucessfully_configured": "5",
                "total_number_of_nodes": "5"
            }
        }
    ],
    "kind": "List",
    "metadata": {
        "resourceVersion": "",
        "selfLink": ""
    }
}
各フェーズの説明は以下の通り公式から引用
Phase 1 – Validation
Phase 2 – Node VM vCenter Configuration.
Phase 3 – Move VM to the Working Directory. Rename VM to match with Node Name.
Phase 4 – Validate and backup existing node configuration
Phase 5 – Create vSphere.conf file.
Phase 6 – Update pod manifest and service configuration files.
Phase 7 – Reload systemd unit files and Restart Kubelet Service
Phase 8 – Complete
nodes_sucessfully_configuredとtotal_number_of_nodesが一致したらインストール終了。
動作確認
公式の動的割当によるサンプルを実施する。
まずは、StorageClassを作成する。ここで使用するDatastoreを指定。
$ cat vsphere-volume-sc-fast.yaml
apiVersion: storage.k8s.io/v1
kind: StorageClass
metadata:
  name: fast
provisioner: kubernetes.io/vsphere-volume
parameters:
  datastore: datastore-32
  diskformat: thin
  fstype: ext3
kubectlで作成したファイルを読み込んでStorageClassを作成する
$ kubectl create -f ./vsphere-volume-sc-fast.yaml
storageclass "fast" created
次にPersistentVolumeClaimを作成する。
設定ファイルには1G割当てるよう設定。
$ cat vsphere-volume-pvcsc.yaml
kind: PersistentVolumeClaim
apiVersion: v1
metadata:
  name: pvcsc001
  annotations:
    volume.beta.kubernetes.io/storage-class: fast
spec:
  accessModes:
    - ReadWriteOnce
  resources:
    requests:
      storage: 1Gi
設定を読み込み、PersistentVolumeClaimを作成する。
$ kubectl create -f ./vsphere-volume-pvcsc.yaml
persistentvolumeclaim "pvcsc001" created
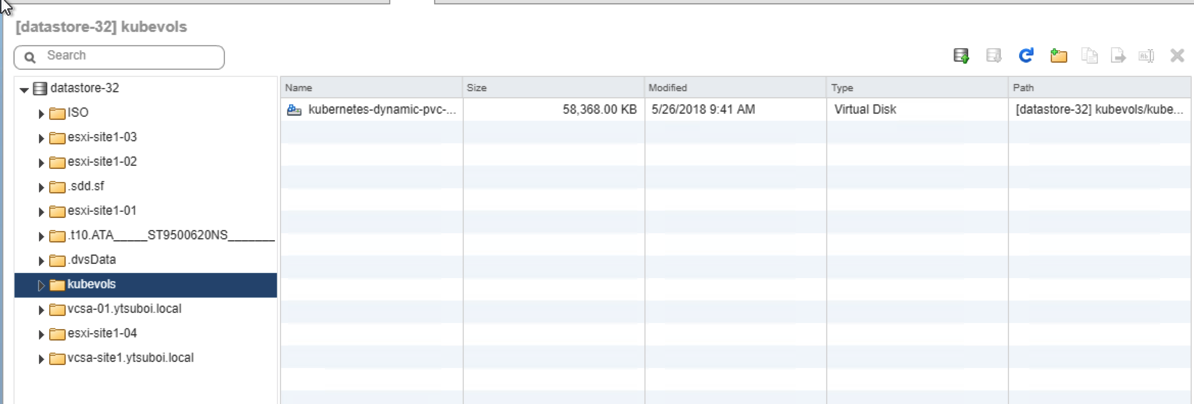
Volumeの作成に成功すると、vCenter上からも確認できる。
$ kubectl describe pvc pvcsc001
Name:          pvcsc001
Namespace:     default
StorageClass:  fast
Status:        Bound
Volume:        pvc-09003d50-6033-11e8-9334-005056a85084
Labels:        <none>
Annotations:   pv.kubernetes.io/bind-completed=yes
               pv.kubernetes.io/bound-by-controller=yes
               volume.beta.kubernetes.io/storage-class=fast
               volume.beta.kubernetes.io/storage-provisioner=kubernetes.io/vsphere-volume
Capacity:      1Gi
Access Modes:  RWO
Events:
  Type    Reason                 Age   From                         Message
  ----    ------                 ----  ----                         -------
  Normal  ProvisioningSucceeded  3s    persistentvolume-controller  Successfully provisioned volume pvc-09003d50-6033-11e8-9334-005056a85084 using kubernetes.io/vsphere-volume

$ kubectl describe pv pvc-09003d50-6033-11e8-9334-005056a85084
Name:            pvc-09003d50-6033-11e8-9334-005056a85084
Labels:          <none>
Annotations:     kubernetes.io/createdby=vsphere-volume-dynamic-provisioner
                 pv.kubernetes.io/bound-by-controller=yes
                 pv.kubernetes.io/provisioned-by=kubernetes.io/vsphere-volume
StorageClass:    fast
Status:          Bound
Claim:           default/pvcsc001
Reclaim Policy:  Delete
Access Modes:    RWO
Capacity:        1Gi
Message:
Source:
    Type:        vSphereVolume (a Persistent Disk resource in vSphere)
    VolumePath:      StoragePolicyName:  %v

    FSType:                            [datastore-32] kubevols/kubernetes-dynamic-pvc-09003d50-6033-11e8-9334-005056a85084.vmdk
%!(EXTRA string=ext3, string=)Events:  <none>

続いて、Podの作成
$ cat vsphere-volume-pvcscpod.yaml
apiVersion: v1
kind: Pod
metadata:
  name: pvpod
spec:
  containers:
  - name: test-container
    image: gcr.io/google_containers/test-webserver
    volumeMounts:
    - name: test-volume
      mountPath: /test-vmdk
  volumes:
  - name: test-volume
    persistentVolumeClaim:
      claimName: pvcsc001
ファイルを読み込んでテストPodを作成
$ kubectl create -f vsphere-volume-pvcscpod.yaml
pod "pvpod" created
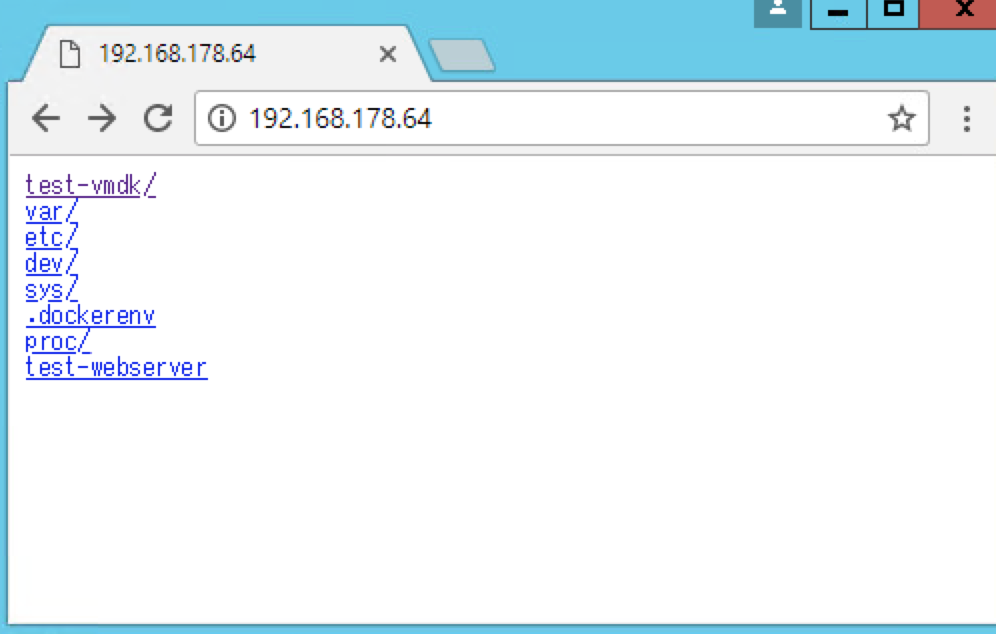
Podが作成されて、httpでアクセスするとマウントされたフォルダ見える。

Podが動いているnodeでdfすると、/dev/sdcがPodにマウントされていることもわかる。
[root@k8s-node1 ~]# df
Filesystem          1K-blocks    Used Available Use% Mounted on
<snip>
/dev/sdc               999320    1320    945572   1% /var/lib/kubelet/pods/72766099-607d-11e8-b2ae-005056a8a2b0/volumes/kubernetes.io~vsphere-volume/pvc-09003d50-6033-11e8-9334-005056a85084
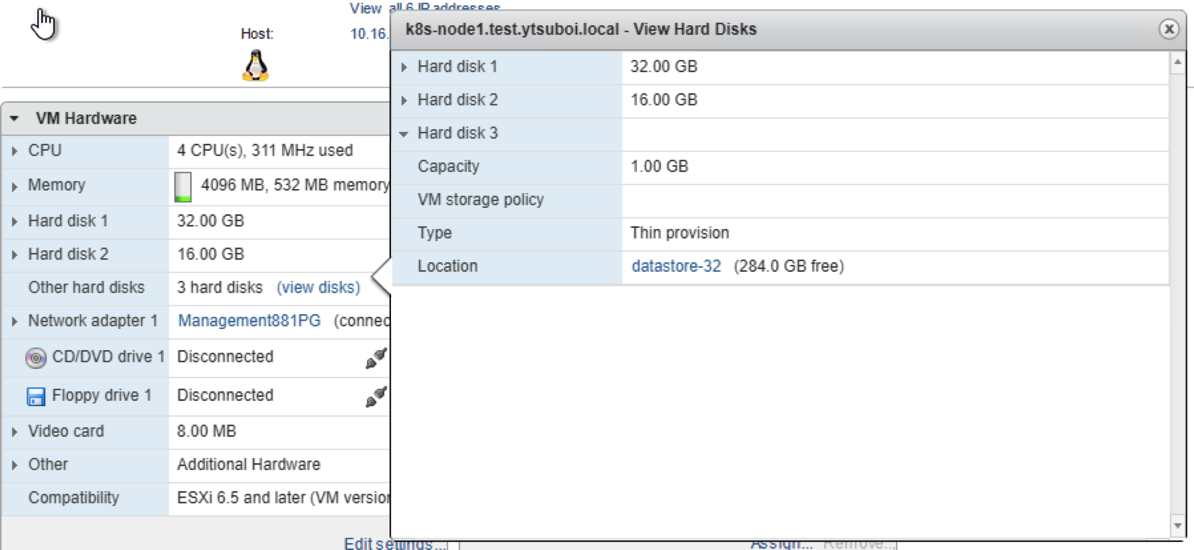
vCenterからはハードディスクが追加されていることも確認。

podを消して、同じPersistetVolumeを使う異なるPodを使ってもデータが残っていることが確認できる。
参考
https://vmware.github.io/vsphere-storage-for-kubernetes/documentation/index.html