CephとGlanceを連携してみたのでメモ

目次
下準備
RHEL サブスクリプション登録
[shell]subscription-manager registersubscription-manager list –available | grep -A8 “Red Hat Ceph Storage”
subscription-manager attach –pool=<pool id>
[/shell]
必要なレポジトリの有効化
[shell]subscription-manager repos –enable=rhel-7-server-rpms \–enable=rhel-7-server-rhceph-1.2-calamari-rpms –enable=rhel-7-server-rhceph-1.2-installer-rpms \
–enable=rhel-7-server-rhceph-1.2-mon-rpms –enable=rhel-7-server-rhceph-1.2-osd-rpms
[/shell]
パッケージの最新化
[shell]yum update[/shell]
host名解決
[shell]/etc/hosts# 各ノードを登録する
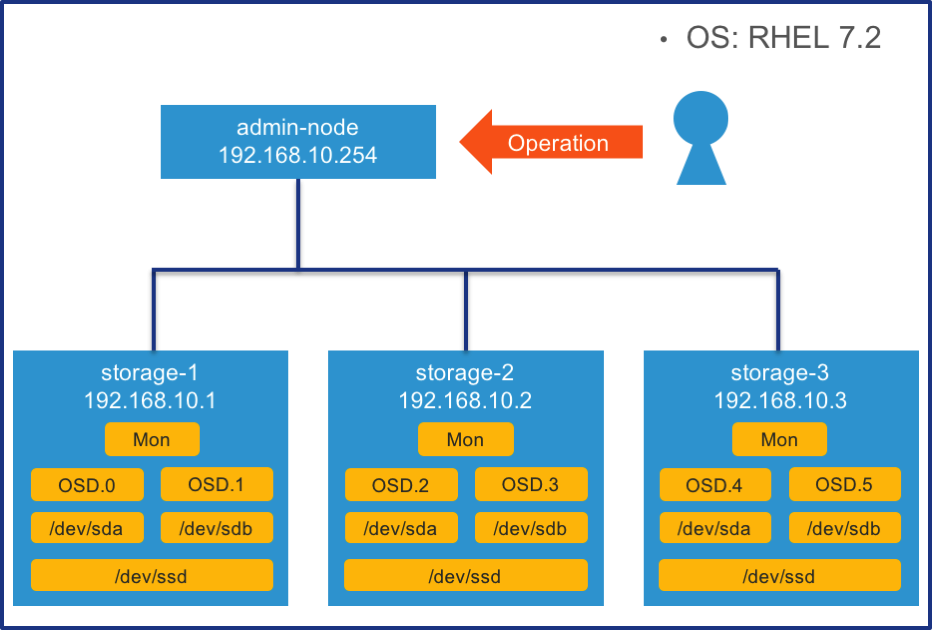
192.168.10.254 admin-node
192.168.10.1 storage-1
192.168.10.2 storage-2
192.168.10.3 storage-3
[/shell]
Firewallでポートを開放
[shell]# On Calamari node(今回だとadmin-node)sudo firewall-cmd –add-port=80/tcp –permanent
sudo firewall-cmd –add-port=2003/tcp –permanent
sudo firewall-cmd –add-port=4505-4506/tcp –permanent
sudo firewall-cmd –reload
# Monitor and Ceph node(今回だとstorage-1,2,3)
sudo firewall-cmd –add-port=6789/tcp –permanent
# OSDが4つの場合には 4 * 3 = 12 ポート開放する
sudo firewall-cmd –add-port=6800-6811/tcp –permanent
sudo firewall-cmd –reload
[/shell]
NTP設定
[shell]sudo yum install ntp# 必要に応じて/etc/ntp.confを編集
systemctl enable ntpd.service
sudo systemctl start ntpd
# NTPが正常に動作しているか確認
sudo systemctl status ntpd
# 同期が取れているか確認
ntpq -p
[/shell]
ceph ユーザ作成
[shell]# on storage nodessudo useradd cephsudo passwd ceph
cat << EOF >/etc/sudoers.d/ceph
ceph ALL = (root) NOPASSWD:ALL
Defaults:ceph !requiretty
EOF
sudo chmod 0440 /etc/sudoers.d/ceph
[/shell]
SSHでパスワード無しで各ストレージノードへアクセスできるようにする
[shell]ssh-keygenssh-copy-id ceph@storage-1
ssh-copy-id ceph@storage-2
ssh-copy-id ceph@storage-3
# ~/.ssh/config を編集してstorage-1にログインする際のユーザを指定する
Host storage-1
Hostname storage-1
User ceph
Host storage-2
Hostname storage-2
User ceph
Host storage-3
Hostname storage-3
User ceph
[/shell]
SELINUXの無効化
[shell]sed -i “s/SELINUX=.*/SELINUX=permissive/” /etc/selinux/configsetenforce 0
[/shell]
Admin nodeの設定
イメージのダウンロード
Redhatの公式サイトから”rhceph-1.2.3-rhel-7-x86_64.iso”をダウンロード
イメージの配置
[shell]sudo mount -o loop <path_to_iso>/rhceph-1.2.3-rhel-6-x86_64.iso /mnt[/shell]鍵のインポート
[shell]sudo cp /mnt/RHCeph-Calamari-1.2-x86_64-c1e8ca3b6c57-285.pem /etc/pki/product/285.pemsudo cp /mnt/RHCeph-Installer-1.2-x86_64-8ad6befe003d-281.pem /etc/pki/product/281.pem
sudo cp /mnt/RHCeph-MON-1.2-x86_64-d8afd76a547b-286.pem /etc/pki/product/286.pem
sudo cp /mnt/RHCeph-OSD-1.2-x86_64-25019bf09fe9-288.pem /etc/pki/product/288.pem
[/shell]
パッケージのインストール
[shell]sudo yum install /mnt/ice_setup-*.rpm[/shell]作業用ディレクトリの作成
[shell]mkdir ~/ceph-configcd ~/ceph-config
[/shell]
admin-nodeの設定(パッケージのインストールなど)
[shell] sudo ice_setup -d /mntsudo calamari-ctl initialize
[/shell]
Cephのインストール
[shell] # admin nodeの作業用ディレクトリで以下実施cd ~/ceph-config
[/shell]
クラスターを作成
[shell] ceph-deploy new storage-1 storage-2 storage-3[/shell]
admin nodeにcephのインストール
[shell] ceph-deploy install admin-node[/shell]
storage nodeにcephのインストール
[shell] ceph-deploy install storage-1 storage-2 storage-3[/shell]
モニターノードの登録
[shell] ceph-deploy mon create-initial[/shell]
admin nodeをcephのadminとして登録
[shell] ceph-deploy admin admin-node[/shell]
イメージの初期化
[shell] ceph-deploy disk zap storage-1:sda storage-1:sdbceph-deploy disk zap storage-2:sda storage-2:sdb
ceph-deploy disk zap storage-3:sda storage-3:sdb
[/shell]
SSDにパーティションを作成(今回は1つのstorageノードにつき2OSD作るので、2つパーティションを作成)
[shell] # /dev/ssd1 /dev/ssd2を作成gdisk /dev/ssd
[/shell]
OSDの準備
[shell] ceph-deploy osd prepare storage-1:sda:ssd1 storage-2:sda:ssd1 storage-3:sda:ssd1ceph-deploy osd prepare storage-1:sdb:ssd2 storage-2:sdb:ssd2 storage-3:sdb:ssd2
[/shell]
OSDの有効化
[shell] ceph-deploy osd activate storage-1:sda1:ssd1 storage-2:sda1:ssd1 storage-3:sda1:ssd1ceph-deploy osd activate storage-1:sdb1:ssd2 storage-2:sdb1:ssd2 storage-3:sdb1:ssd2
[/shell]
OSDの確認
[shell] ceph osd stat[/shell]
cephの正常性確認
[shell] ceph health[/shell]
poolの確認
[shell] ceph osd lspools[/shell]
GlanceでCephを使用するようにする
Glance用Ceph poolを作成
[shell] # on admin nodesudo ceph pool create images 128
[/shell]
Calamari nodeのレポジトリを登録 on openstack controller node
[shell] # on openstack controller node# /etc/yum.repos.d/ceph.repoを以下のように作成
[ceph] name=Ceph
baseurl=http://admin-node/static/ceph/0.80.8
enabled=1
gpgcheck=1
type=repo-md
gpgkey=file:///etc/pki/rpm-gpg/RPM-GPG-KEY-redhat-release
proxy=_none_
priority=1
/shell]
cephのインストール
[shell] # on openstack controller nodeyum install ceph
[/shell]
cephの設定をadmin nodeからコピー
[shell] # on openstack controller nodesudo mkdir /etc/ceph
scp admin-node:/etc/ceph/ceph.conf /etc/ceph/ceph.conf
[/shell]
ceph用ユーザの作成とキーの登録
[shell] # on admin nodesudo ceph auth get-or-create client.images mon ‘allow r’ osd ‘allow class-read object_prefix rbd_children, allow rwx pool=images’
sudo ceph auth get-or-create client.images > /tmp/ceph.client.images.keyring
scp /tmp/ceph.client.images.keyring controller:/etc/ceph/ceph.client.images.keyring
# on openstack controller node
sudo chown glance:glance /etc/ceph/ceph.client.images.keyring
[/shell]
glanceにてcephを使う設定
[shell] # /etc/glance/glance-api.confの編集 [DEFAULT] …default_store = rbd
…
[glance_store] stores = rbd
default_store=rbd
rbd_store_pool = images
rbd_store_user = images
rbd_store_ceph_conf = /etc/ceph/ceph.conf
rbd_store_chunk_size = 8
[/shell]
glanceのサービスを再起動
[shell] sudo systemctl restart openstack-glance-api[/shell]
メモ
[shell] # on admin noderados ls -p images
[/shell] を使うと登録されたimageがあることが確認できる
参考
- https://access.redhat.com/documentation/en/red-hat-ceph-storage/version-1.2.3/red-hat-ceph-storage-123-installation-guide-for-rhel-x86-64/
- http://docs.ceph.com/docs/master/rbd/rbd-openstack/