Master、Worker、Management、LBノードにKubernetesをインストールしていく。 kubeadmのインストール方法は更新速度が早いので、基本は公式を参考に。
目次
アーキテクチャ
今回はetcdをMaster内に内蔵したものを構築する。 コンポーネントは以下の通りになる。
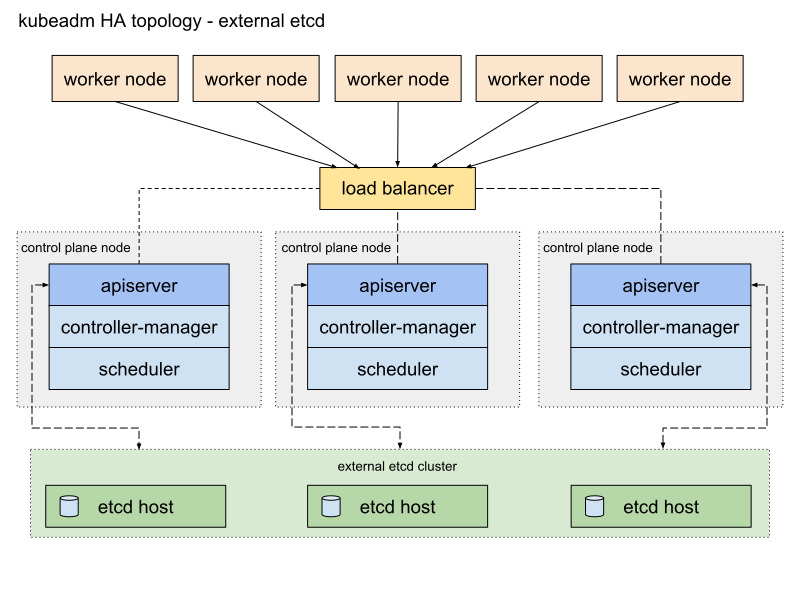
メリット・デメリットはここにかかれている通り、Master1台が落ちたときにkubernetesのコントロールプレーンとetcdに同時に影響がある点。 ここは、Masterの数を増やすことでカバーできる。
Kuberentesのインストール
dockerのインストール
まずコンテナランタイムをインストールする。 現在はCRI(Container Runtime Interface)が定義され、Docker以外のコンテナランタイムも利用可能。とはいえ、以前Docker以外を使うメリットもないので、Dockerをインストール。
公式を参考に。
sudo -s

apt-get update && apt-get install apt-transport-https ca-certificates curl software-properties-common

curl -fsSL https://download.docker.com/linux/ubuntu/gpg | apt-key add -

add-apt-repository "deb [arch=amd64] https://download.docker.com/linux/ubuntu $(lsb_release -cs) stable"

apt-get update && apt-get install docker-ce=18.06.0~ce~3-0~ubuntu

cat > /etc/docker/daemon.json <<EOF
{
  "exec-opts": ["native.cgroupdriver=systemd"],
  "log-driver": "json-file",
  "log-opts": {
    "max-size": "100m"
  },
  "storage-driver": "overlay2"
}
EOF

mkdir -p /etc/systemd/system/docker.service.d

systemctl daemon-reload
systemctl restart docker
下記のようにdockerが動いていればOK。
# systemctl status docker
● docker.service - Docker Application Container Engine
   Loaded: loaded (/lib/systemd/system/docker.service; enabled; vendor preset: enabled)
   Active: active (running) since Mon 2019-01-07 10:15:45 +08; 1min 56s ago
     Docs: https://docs.docker.com
 Main PID: 24896 (dockerd)
    Tasks: 35
   Memory: 54.6M
      CPU: 1.517s
   CGroup: /system.slice/docker.service
           ├─24896 /usr/bin/dockerd -H fd://
           └─24912 docker-containerd --config /var/run/docker/containerd/containerd.toml
念の為、apt-get upgradeでdockerがアップグレードされないようにHoldマークをパッケージにつけておく。
apt-mark hold docker-ce
localadminも権限なくdockerコマンドが可能なようにdockerグループへ追加。
usermod -aG docker localadmin
kubeadmのインストール
kubeadm、kubelet、kubectlのインストール。 公式を参考に。
apt-get update && apt-get install -y apt-transport-https curl

curl -s https://packages.cloud.google.com/apt/doc/apt-key.gpg | apt-key add -

cat <<EOF >/etc/apt/sources.list.d/kubernetes.list
deb https://apt.kubernetes.io/ kubernetes-xenial main
EOF

apt-get update

apt-get install -y kubelet kubeadm kubectl

apt-mark hold kubelet kubeadm kubectl
最後にswapを無効化する。
swapoff -a
再起動しても、swapが有効化されないように/etc/fstabのswapの行をコメントアウトする。以下は例。
# /dev/mapper/1604--template--vg-swap_1 none swap sw 0 0
1台目のMasterノードをセットアップ
公式を参考に。
各ノードの/etc/hostsに以下の行を追加。
192.168.1.10 k8s-api k8s-api.corp.local
公式手順に則り、kubeadmで使用する設定ファイルを作成する。
apiVersion: kubeadm.k8s.io/v1beta1
kind: ClusterConfiguration
kubernetesVersion: stable
apiServer:
  certSANs:
  - "k8s-api.corp.local"
  extraArgs:
    enable-admission-plugins: NamespaceLifecycle,LimitRanger,ServiceAccount,DefaultStorageClass,DefaultTolerationSeconds,MutatingAdmissionWebhook,ValidatingAdmissionWebhook,ResourceQuota,DenyEscalatingExec
controlPlaneEndpoint: "k8s-api.corp.local:6443"
networking:
  podSubnet: 10.244.0.0/16
変更点は、以下の通り。
- Admission-Controlの設定を追加。
- Flannelを使用するのでpodSubnetを指定。デフォルトで特に問題ないので、10.244.0.0/16のまま。
作成した設定ファイルを用いて、1台目のMasterノードをセットアップ。
sudo kubeadm init --config=kubeadm-config.yml
以下はコマンドの結果の一例。
# kubeadm init --config=kubeadm-config.yml
[init] Using Kubernetes version: v1.13.1
[preflight] Running pre-flight checks
[preflight] Pulling images required for setting up a Kubernetes cluster
[preflight] This might take a minute or two, depending on the speed of your internet connection
[preflight] You can also perform this action in beforehand using 'kubeadm config images pull'
[kubelet-start] Writing kubelet environment file with flags to file "/var/lib/kubelet/kubeadm-flags.env"
[kubelet-start] Writing kubelet configuration to file "/var/lib/kubelet/config.yaml"
[kubelet-start] Activating the kubelet service
[certs] Using certificateDir folder "/etc/kubernetes/pki"
[certs] Generating "ca" certificate and key
[certs] Generating "apiserver" certificate and key
[certs] apiserver serving cert is signed for DNS names [k8s-master-01 kubernetes kubernetes.default kubernetes.default.svc kubernetes.default.svc.cluster.local k8s-api.corp.local k8s-api.corp.local] and IPs [10.96.0.1 192.168.1.21]
[certs] Generating "apiserver-kubelet-client" certificate and key
[certs] Generating "front-proxy-ca" certificate and key
[certs] Generating "front-proxy-client" certificate and key
[certs] Generating "etcd/ca" certificate and key
[certs] Generating "etcd/server" certificate and key
[certs] etcd/server serving cert is signed for DNS names [k8s-master-01 localhost] and IPs [192.168.1.21 127.0.0.1 ::1]
[certs] Generating "etcd/peer" certificate and key
[certs] etcd/peer serving cert is signed for DNS names [k8s-master-01 localhost] and IPs [192.168.1.21 127.0.0.1 ::1]
[certs] Generating "etcd/healthcheck-client" certificate and key
[certs] Generating "apiserver-etcd-client" certificate and key
[certs] Generating "sa" key and public key
[kubeconfig] Using kubeconfig folder "/etc/kubernetes"
[kubeconfig] Writing "admin.conf" kubeconfig file
[kubeconfig] Writing "kubelet.conf" kubeconfig file
[kubeconfig] Writing "controller-manager.conf" kubeconfig file
[kubeconfig] Writing "scheduler.conf" kubeconfig file
[control-plane] Using manifest folder "/etc/kubernetes/manifests"
[control-plane] Creating static Pod manifest for "kube-apiserver"
[control-plane] Creating static Pod manifest for "kube-controller-manager"
[control-plane] Creating static Pod manifest for "kube-scheduler"
[etcd] Creating static Pod manifest for local etcd in "/etc/kubernetes/manifests"
[wait-control-plane] Waiting for the kubelet to boot up the control plane as static Pods from directory "/etc/kubernetes/manifests". This can take up to 4m0s
[apiclient] All control plane components are healthy after 23.522465 seconds
[uploadconfig] storing the configuration used in ConfigMap "kubeadm-config" in the "kube-system" Namespace
[kubelet] Creating a ConfigMap "kubelet-config-1.13" in namespace kube-system with the configuration for the kubelets in the cluster
[patchnode] Uploading the CRI Socket information "/var/run/dockershim.sock" to the Node API object "k8s-master-01" as an annotation
[mark-control-plane] Marking the node k8s-master-01 as control-plane by adding the label "node-role.kubernetes.io/master=''"
[mark-control-plane] Marking the node k8s-master-01 as control-plane by adding the taints [node-role.kubernetes.io/master:NoSchedule]
[bootstrap-token] Using token: 9e0ws1.t9x1ojqfh8bcj3cd
[bootstrap-token] Configuring bootstrap tokens, cluster-info ConfigMap, RBAC Roles
[bootstraptoken] configured RBAC rules to allow Node Bootstrap tokens to post CSRs in order for nodes to get long term certificate credentials
[bootstraptoken] configured RBAC rules to allow the csrapprover controller automatically approve CSRs from a Node Bootstrap Token
[bootstraptoken] configured RBAC rules to allow certificate rotation for all node client certificates in the cluster
[bootstraptoken] creating the "cluster-info" ConfigMap in the "kube-public" namespace
[addons] Applied essential addon: CoreDNS
[addons] Applied essential addon: kube-proxy

Your Kubernetes master has initialized successfully!

To start using your cluster, you need to run the following as a regular user:

  mkdir -p $HOME/.kube
  sudo cp -i /etc/kubernetes/admin.conf $HOME/.kube/config
  sudo chown $(id -u):$(id -g) $HOME/.kube/config

You should now deploy a pod network to the cluster.
Run "kubectl apply -f [podnetwork].yaml" with one of the options listed at:
  https://kubernetes.io/docs/concepts/cluster-administration/addons/

You can now join any number of machines by running the following on each node
as root:

  kubeadm join k8s-api.corp.local:6443 --token 9e0ws1.t9x1ojqfh8bcj3cd --discovery-token-ca-cert-hash sha256:837ad52464b6de6de3f7711b94119b75394b3db0493d4843da635473037f4638
結果に書かれているコマンドを用いて、設定ファイルをデフォルトの場所にコピーする。
mkdir -p $HOME/.kube
sudo cp -i /etc/kubernetes/admin.conf $HOME/.kube/config
sudo chown $(id -u):$(id -g) $HOME/.kube/config
LBの動作確認と、1台目の正常性確認を以下のコマンドで行う。
kubectl get node
インストールができていれば以下のような出力が確認できる。
$ kubectl get node
NAME            STATUS     ROLES    AGE    VERSION
k8s-master-01   NotReady   master   6m5s   v1.13.1
CNIをインストールしていないため、NotReadyで問題ない。 また、kube-controller-managerのオプションとして、canalに必要なcidrの設定が入っていることを確認。
$ ps aux | grep kube-controller-manager
root     24110  4.9  0.6 206292 109324 ?       Ssl  11:08   0:13 kube-controller-manager --address=127.0.0.1 --allocate-node-cidrs=true --authentication-kubeconfig=/etc/kubernetes/controller-manager.conf --authorization-kubeconfig=/etc/kubernetes/controller-manager.conf --client-ca-file=/etc/kubernetes/pki/ca.crt --cluster-cidr=10.244.0.0/16 --cluster-signing-cert-file=/etc/kubernetes/pki/ca.crt --cluster-signing-key-file=/etc/kubernetes/pki/ca.key --controllers=*,bootstrapsigner,tokencleaner --kubeconfig=/etc/kubernetes/controller-manager.conf --leader-elect=true --node-cidr-mask-size=24 --requestheader-client-ca-file=/etc/kubernetes/pki/front-proxy-ca.crt --root-ca-file=/etc/kubernetes/pki/ca.crt --service-account-private-key-file=/etc/kubernetes/pki/sa.key --use-service-account-credentials=true
--allocate-node-cidrs=trueと--cluster-cidr=10.244.0.0/16が確認できればOK。
続いて、canalをインストールする。公式に。
curl https://docs.projectcalico.org/v3.4/getting-started/kubernetes/installation/hosted/canal/canal.yaml -O
kubectl apply -f canal.yaml
PodSubnetをデフォルトから変更している場合には、canal.yamlを編集する必要あり。 少し経つと、canalのインストールが完了して、corednsがReadyとなり、MasterノードもReadyとなる。
CNIがインストールされていることを確認。
$ ls -la /etc/cni/net.d/
total 16
drwxr-xr-x 2 root root 4096 Jan  7 11:15 .
drwxr-xr-x 3 root root 4096 Jan  7 11:15 ..
-rw-rw-r-- 1 root root  542 Jan  7 11:15 10-canal.conflist
-rw------- 1 root root 2541 Jan  7 11:15 calico-kubeconfig
canalのPodがReadyになっていることを確認。
$ kubectl get pod -n kube-system
NAME                                    READY   STATUS    RESTARTS   AGE
canal-2j5sr                             2/2     Running   0          48s
coredns-86c58d9df4-l5d89                1/1     Running   0          7m30s
coredns-86c58d9df4-rnvjm                1/1     Running   0          7m30s
etcd-k8s-master-01                      1/1     Running   0          6m34s
kube-apiserver-k8s-master-01            1/1     Running   0          7m
kube-controller-manager-k8s-master-01   1/1     Running   0          6m32s
kube-proxy-gcj85                        1/1     Running   0          7m30s
kube-scheduler-k8s-master-01            1/1     Running   0          6m55s
MasterがReadyになっていることを確認。
$ kubectl get node
NAME            STATUS   ROLES    AGE     VERSION
k8s-master-01   Ready    master   9m29s   v1.13.1
最後に証明書を他のMasterノードに配布する。
USER=localadmin
CONTROL_PLANE_IPS="192.168.1.22 192.168.1.23"
for host in ${CONTROL_PLANE_IPS}; do
    scp /etc/kubernetes/pki/ca.crt "${USER}"@$host:
    scp /etc/kubernetes/pki/ca.key "${USER}"@$host:
    scp /etc/kubernetes/pki/sa.key "${USER}"@$host:
    scp /etc/kubernetes/pki/sa.pub "${USER}"@$host:
    scp /etc/kubernetes/pki/front-proxy-ca.crt "${USER}"@$host:
    scp /etc/kubernetes/pki/front-proxy-ca.key "${USER}"@$host:
    scp /etc/kubernetes/pki/etcd/ca.crt "${USER}"@$host:etcd-ca.crt
    scp /etc/kubernetes/pki/etcd/ca.key "${USER}"@$host:etcd-ca.key
    scp /etc/kubernetes/admin.conf "${USER}"@$host:
done
2台目、3台目のMasterノードのセットアップ
1台目からコピーした証明書を正しいディレクトリに配置する。
USER=localadmin
mkdir -p /etc/kubernetes/pki/etcd
mv /home/${USER}/ca.crt /etc/kubernetes/pki/
mv /home/${USER}/ca.key /etc/kubernetes/pki/
mv /home/${USER}/sa.pub /etc/kubernetes/pki/
mv /home/${USER}/sa.key /etc/kubernetes/pki/
mv /home/${USER}/front-proxy-ca.crt /etc/kubernetes/pki/
mv /home/${USER}/front-proxy-ca.key /etc/kubernetes/pki/
mv /home/${USER}/etcd-ca.crt /etc/kubernetes/pki/etcd/ca.crt
mv /home/${USER}/etcd-ca.key /etc/kubernetes/pki/etcd/ca.key
mv /home/${USER}/admin.conf /etc/kubernetes/admin.conf
その後、1台目をセットアップした際に取得したjoinコマンドに--experimental-control-planeを付加して実行する。
kubeadm join k8s-api.corp.local:6443 --token 9e0ws1.t9x1ojqfh8bcj3cd --discovery-token-ca-cert-hash sha256:837ad52464b6de6de3f7711b94119b75394b3db0493d4843da635473037f4638 --experimental-control-plane
以下は結果の例。
# kubeadm join k8s-api.corp.local:6443 --token 9e0ws1.t9x1ojqfh8bcj3cd --discovery-token-ca-cert-hash sha256:837ad52464b6de6de3f7711b94119b75394b3db0493d4843da635473037f4638 --experimental-control-plane
[preflight] Running pre-flight checks
[discovery] Trying to connect to API Server "k8s-api.corp.local:6443"
[discovery] Created cluster-info discovery client, requesting info from "https://k8s-api.corp.local:6443"
[discovery] Requesting info from "https://k8s-api.corp.local:6443" again to validate TLS against the pinned public key
[discovery] Cluster info signature and contents are valid and TLS certificate validates against pinned roots, will use API Server "k8s-api.corp.local:6443"
[discovery] Successfully established connection with API Server "k8s-api.corp.local:6443"
[join] Reading configuration from the cluster...
[join] FYI: You can look at this config file with 'kubectl -n kube-system get cm kubeadm-config -oyaml'
[join] Running pre-flight checks before initializing the new control plane instance
[certs] Generating "apiserver-kubelet-client" certificate and key
[certs] Generating "apiserver" certificate and key
[certs] apiserver serving cert is signed for DNS names [k8s-master-02 kubernetes kubernetes.default kubernetes.default.svc kubernetes.default.svc.cluster.local k8s-api.corp.local k8s-api.corp.local] and IPs [10.96.0.1 192.168.1.22]
[certs] Generating "front-proxy-client" certificate and key
[certs] Generating "etcd/server" certificate and key
[certs] etcd/server serving cert is signed for DNS names [k8s-master-02 localhost] and IPs [192.168.1.22 127.0.0.1 ::1]
[certs] Generating "etcd/healthcheck-client" certificate and key
[certs] Generating "apiserver-etcd-client" certificate and key
[certs] Generating "etcd/peer" certificate and key
[certs] etcd/peer serving cert is signed for DNS names [k8s-master-02 localhost] and IPs [192.168.1.22 127.0.0.1 ::1]
[certs] valid certificates and keys now exist in "/etc/kubernetes/pki"
[certs] Using the existing "sa" key
[kubeconfig] Using existing up-to-date kubeconfig file: "/etc/kubernetes/admin.conf"
[kubeconfig] Writing "controller-manager.conf" kubeconfig file
[kubeconfig] Writing "scheduler.conf" kubeconfig file
[etcd] Checking Etcd cluster health
[kubelet] Downloading configuration for the kubelet from the "kubelet-config-1.13" ConfigMap in the kube-system namespace
[kubelet-start] Writing kubelet configuration to file "/var/lib/kubelet/config.yaml"
[kubelet-start] Writing kubelet environment file with flags to file "/var/lib/kubelet/kubeadm-flags.env"
[kubelet-start] Activating the kubelet service
[tlsbootstrap] Waiting for the kubelet to perform the TLS Bootstrap...
[patchnode] Uploading the CRI Socket information "/var/run/dockershim.sock" to the Node API object "k8s-master-02" as an annotation
[etcd] Announced new etcd member joining to the existing etcd cluster
[etcd] Wrote Static Pod manifest for a local etcd instance to "/etc/kubernetes/manifests/etcd.yaml"
[uploadconfig] storing the configuration used in ConfigMap "kubeadm-config" in the "kube-system" Namespace
[mark-control-plane] Marking the node k8s-master-02 as control-plane by adding the label "node-role.kubernetes.io/master=''"
[mark-control-plane] Marking the node k8s-master-02 as control-plane by adding the taints [node-role.kubernetes.io/master:NoSchedule]

This node has joined the cluster and a new control plane instance was created:

* Certificate signing request was sent to apiserver and approval was received.
* The Kubelet was informed of the new secure connection details.
* Master label and taint were applied to the new node.
* The Kubernetes control plane instances scaled up.
* A new etcd member was added to the local/stacked etcd cluster.

To start administering your cluster from this node, you need to run the following as a regular user:

    mkdir -p $HOME/.kube
    sudo cp -i /etc/kubernetes/admin.conf $HOME/.kube/config
    sudo chown $(id -u):$(id -g) $HOME/.kube/config

Run 'kubectl get nodes' to see this node join the cluster.
2台目のMasterノードが組み込まれたことを確認する。
ノードがReadyであることを確認。
# kubectl get node
NAME            STATUS   ROLES    AGE     VERSION
k8s-master-01   Ready    master   6m28s   v1.13.1
k8s-master-02   Ready    master   4m27s   v1.13.1
続いて、etcdのクラスタの状態を確認する。 まず、etcdのdockerIDをMasterノード上で取得する。
# docker ps | grep etcd
7a826102a392        3cab8e1b9802           "etcd --advertise-cl…"   9 minutes ago       Up 9 minutes                            k8s_etcd_etcd-k8s-master-01_kube-system_4852a77b7a1655fd249b8ab3854ac6ac_0
9ec072cce7f7        k8s.gcr.io/pause:3.1   "/pause"                 9 minutes ago       Up 9 minutes                            k8s_POD_etcd-k8s-master-01_kube-system_4852a77b7a1655fd249b8ab3854ac6ac_0
続いて、etcdctlコマンドを使用してクラスタの状態を確認する。
# docker exec 7a826102a392 /bin/sh -c "etcdctl --endpoint https://127.0.0.1:2379 --ca-file /etc/kubernetes/pki/etcd/ca.crt --cert-file /etc/kubernetes/pki/etcd/healthcheck-client.crt --key-file /etc/kubernetes/pki/etcd/healthcheck-client.key cluster-health"
member 22cb69b2fd1bb417 is healthy: got healthy result from https://192.168.1.21:2379
member c5dc9f122ea36c0d is healthy: got healthy result from https://192.168.1.22:2379
cluster is healthy
3台目も同様にkubeadm joinを使って追加し、3台とも組み込まれたことを同じコマンドで確認。
Worker、Management、LBノードの追加
kubeadm joinコマンドを用いて、クラスタにノードを追加する。
各ノードで1台目のときに取得したjoinコマンドを用いて追加。
kubeadm join k8s-api.corp.local:6443 --token 9e0ws1.t9x1ojqfh8bcj3cd --discovery-token-ca-cert-hash sha256:837ad52464b6de6de3f7711b94119b75394b3db0493d4843da635473037f4638
追加後、すべてのノードがReadyになっていることを確認。
$ kubectl get node -o wide
NAME                STATUS   ROLES    AGE    VERSION   INTERNAL-IP    EXTERNAL-IP   OS-IMAGE             KERNEL-VERSION     CONTAINER-RUNTIME
k8s-lb-01           Ready    <none>   53s    v1.13.1   192.168.0.11   <none>        Ubuntu 16.04.5 LTS   4.4.0-72-generic   docker://18.6.0
k8s-lb-02           Ready    <none>   52s    v1.13.1   192.168.0.12   <none>        Ubuntu 16.04.5 LTS   4.4.0-72-generic   docker://18.6.0
k8s-master-01       Ready    master   16m    v1.13.1   192.168.1.21   <none>        Ubuntu 16.04.5 LTS   4.4.0-72-generic   docker://18.6.0
k8s-master-02       Ready    master   14m    v1.13.1   192.168.1.22   <none>        Ubuntu 16.04.5 LTS   4.4.0-72-generic   docker://18.6.0
k8s-master-03       Ready    master   11m    v1.13.1   192.168.1.23   <none>        Ubuntu 16.04.5 LTS   4.4.0-72-generic   docker://18.6.0
k8s-monitoring-01   Ready    <none>   60s    v1.13.1   192.168.1.31   <none>        Ubuntu 16.04.5 LTS   4.4.0-72-generic   docker://18.6.0
k8s-monitoring-02   Ready    <none>   55s    v1.13.1   192.168.1.32   <none>        Ubuntu 16.04.5 LTS   4.4.0-72-generic   docker://18.6.0
k8s-worker-01       Ready    <none>   2m3s   v1.13.1   192.168.1.41   <none>        Ubuntu 16.04.5 LTS   4.4.0-72-generic   docker://18.6.0
k8s-worker-02       Ready    <none>   90s    v1.13.1   192.168.1.42   <none>        Ubuntu 16.04.5 LTS   4.4.0-72-generic   docker://18.6.0
ここで、LBノードがExternalネットワークをInternalIPとして用いているので、kubeletに明示的にManagementネットワークを使用するよう変更。
/etc/default/kubeletファイルを変更して、以下のようにManagementネットワークのIPを挿入する。
KUBELET_EXTRA_ARGS=--node-ip 192.168.1.11
その後、LBノードにてkubeletを再起動。
systemctl restart kubelet
kubectl get nodeすると、ノードのInternalIPが変わっているのがわかる。
$ kubectl get node -o wide
NAME                STATUS   ROLES    AGE     VERSION   INTERNAL-IP    EXTERNAL-IP   OS-IMAGE             KERNEL-VERSION     CONTAINER-RUNTIME
k8s-lb-01           Ready    <none>   7m5s    v1.13.1   192.168.1.11   <none>        Ubuntu 16.04.5 LTS   4.4.0-72-generic   docker://18.6.0
k8s-lb-02           Ready    <none>   7m4s    v1.13.1   192.168.1.12   <none>        Ubuntu 16.04.5 LTS   4.4.0-72-generic   docker://18.6.0
k8s-master-01       Ready    master   22m     v1.13.1   192.168.1.21   <none>        Ubuntu 16.04.5 LTS   4.4.0-72-generic   docker://18.6.0
k8s-master-02       Ready    master   20m     v1.13.1   192.168.1.22   <none>        Ubuntu 16.04.5 LTS   4.4.0-72-generic   docker://18.6.0
k8s-master-03       Ready    master   17m     v1.13.1   192.168.1.23   <none>        Ubuntu 16.04.5 LTS   4.4.0-72-generic   docker://18.6.0
k8s-monitoring-01   Ready    <none>   7m12s   v1.13.1   192.168.1.31   <none>        Ubuntu 16.04.5 LTS   4.4.0-72-generic   docker://18.6.0
k8s-monitoring-02   Ready    <none>   7m7s    v1.13.1   192.168.1.32   <none>        Ubuntu 16.04.5 LTS   4.4.0-72-generic   docker://18.6.0
k8s-worker-01       Ready    <none>   8m15s   v1.13.1   192.168.1.41   <none>        Ubuntu 16.04.5 LTS   4.4.0-72-generic   docker://18.6.0
k8s-worker-02       Ready    <none>   7m42s   v1.13.1   192.168.1.42   <none>        Ubuntu 16.04.5 LTS   4.4.0-72-generic   docker://18.6.0